
Cookies managing
Cookie Settings
Cookies necessary for the correct operation of the site are always enabled.
Other cookies are configurable.
Other cookies are configurable.
How to Prepare a File for CNC Cutting
A practical guide for designers and makers working with plywood, MDF and other wood-based sheet materials — file formats, inner corners, edge quality options and standard sheet sizes
A well-prepared file is the fastest route from idea to finished part. When your drawing arrives production-ready, we quote it quickly and put it straight on the machine. This guide covers the few things that actually matter — and explains the choices you'll be asked about, like edge finish and corner treatment, so you can decide them upfront.
1. File format, units, scale
For flat parts, send a .dxf — the industry standard for 2D cutting. For 3D parts and joinery, .step is best. We also accept .dwg, .ai, .f3d, .3mf, .stl — and if all you have is a sketch or a photo, that works too: we prepare CNC-ready CAD files as part of the job.
Three rules that prevent 90% of file problems:
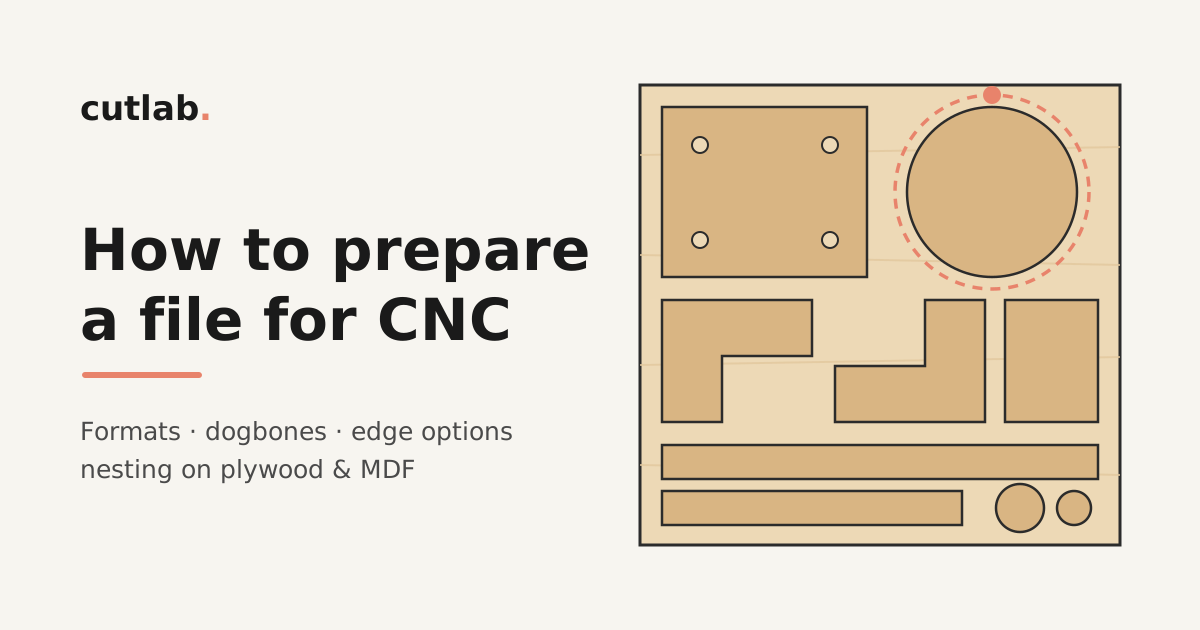
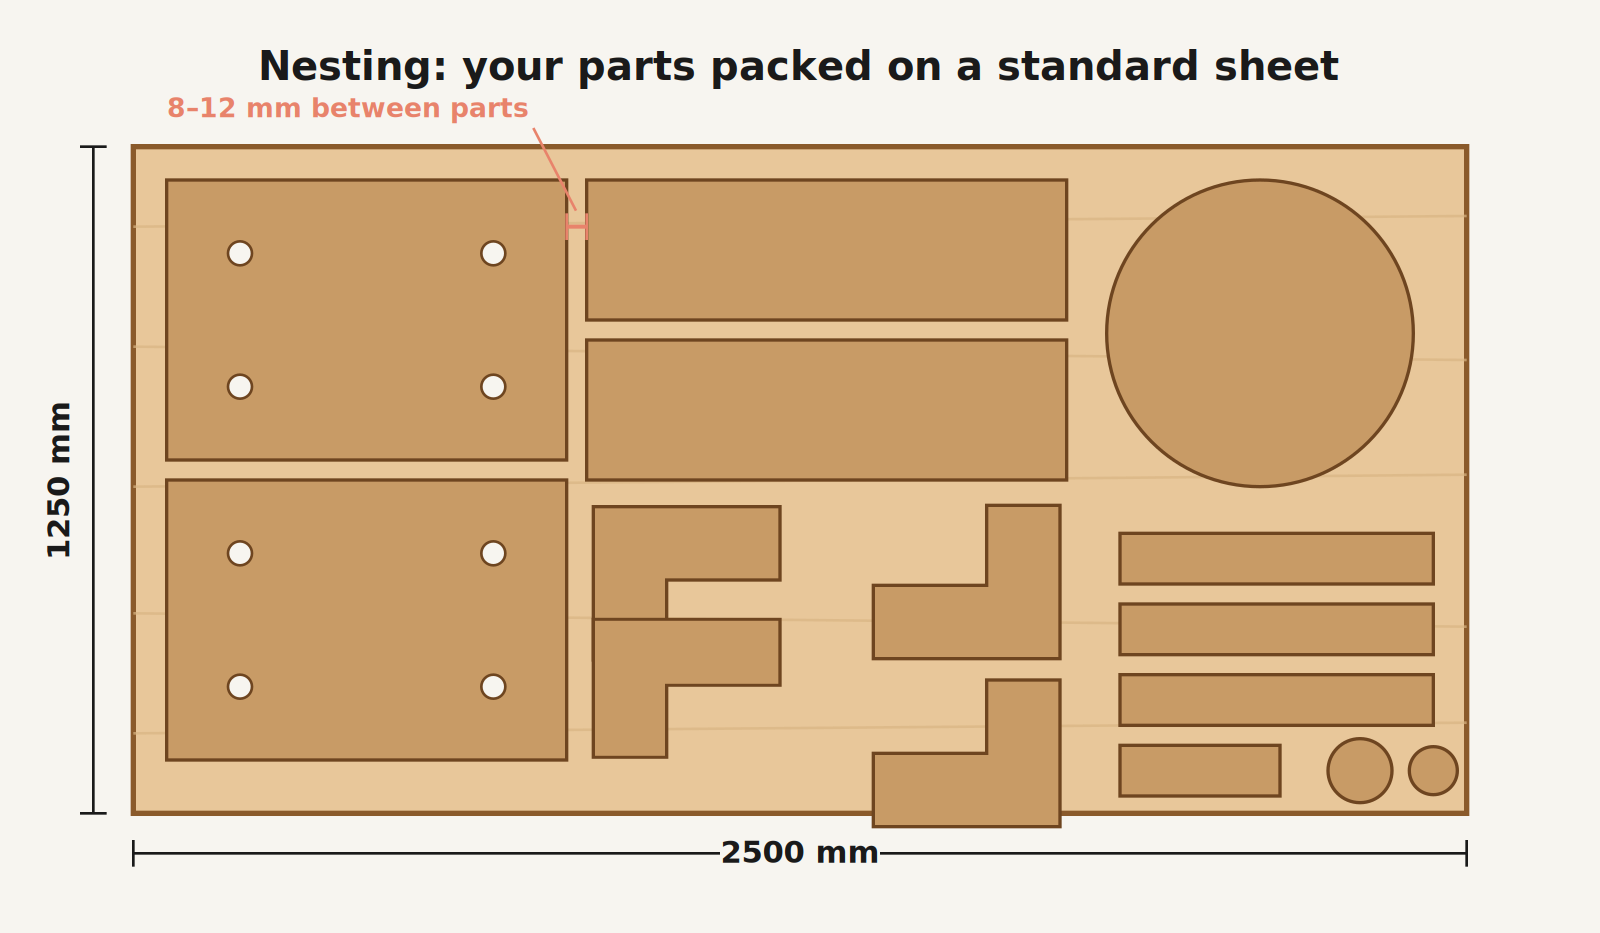
Send parts as separate shapes rather than pre-arranged on a sheet — our nesting software packs them onto the material tighter than manual layout, which directly lowers your material cost. If grain direction matters for a visible part, just mark it.
Three rules that prevent 90% of file problems:
- Export in millimeters, at 1:1 scale.
- Make sure every shape is a closed contour — no gaps, no duplicate lines. The machine cuts along vector paths, and a broken outline can't be turned into a toolpath.
- Convert text to curves before exporting, otherwise your font gets replaced on our side.
Send parts as separate shapes rather than pre-arranged on a sheet — our nesting software packs them onto the material tighter than manual layout, which directly lowers your material cost. If grain direction matters for a visible part, just mark it.
2. Inner corners are always rounded — and what dogbones are for
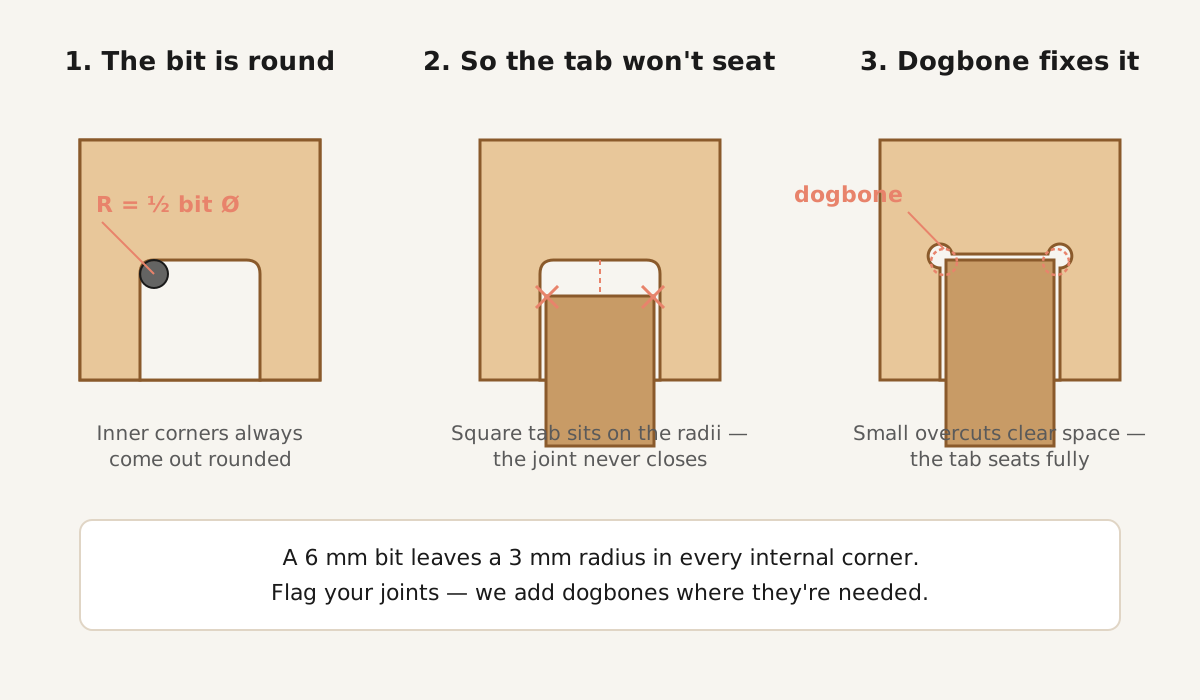
A milling bit is round, typically 4–8 mm in diameter. This has one important consequence: an inner corner can never be perfectly sharp. A 6 mm bit leaves a 3 mm radius inside every internal corner. Outer corners come out sharp — no issue there.
For most parts the small inner radius is invisible and irrelevant. It becomes a problem in one specific case: joinery. If a square tab must slide into a square slot, the rounded slot corners will block it — the tab will sit on the radii and never seat fully.
The fix is a dogbone: a small circular overcut placed in each inner corner of the slot. The bit drills slightly past the corner, clearing space for the sharp corner of the mating part. A variant called a T-bone puts the overcut along one edge instead — useful where a visible dogbone would look wrong.
You don't have to draw dogbones yourself. Just tell us which slots are joints, and we'll add the reliefs where they're needed. If you do model them yourself (many parametric furniture designers do), make the overcut radius match the tool — we cut most joinery with a 6 mm bit.
For most parts the small inner radius is invisible and irrelevant. It becomes a problem in one specific case: joinery. If a square tab must slide into a square slot, the rounded slot corners will block it — the tab will sit on the radii and never seat fully.
The fix is a dogbone: a small circular overcut placed in each inner corner of the slot. The bit drills slightly past the corner, clearing space for the sharp corner of the mating part. A variant called a T-bone puts the overcut along one edge instead — useful where a visible dogbone would look wrong.
You don't have to draw dogbones yourself. Just tell us which slots are joints, and we'll add the reliefs where they're needed. If you do model them yourself (many parametric furniture designers do), make the overcut radius match the tool — we cut most joinery with a 6 mm bit.
3. Edges after cutting: sharp by default, eased as an option
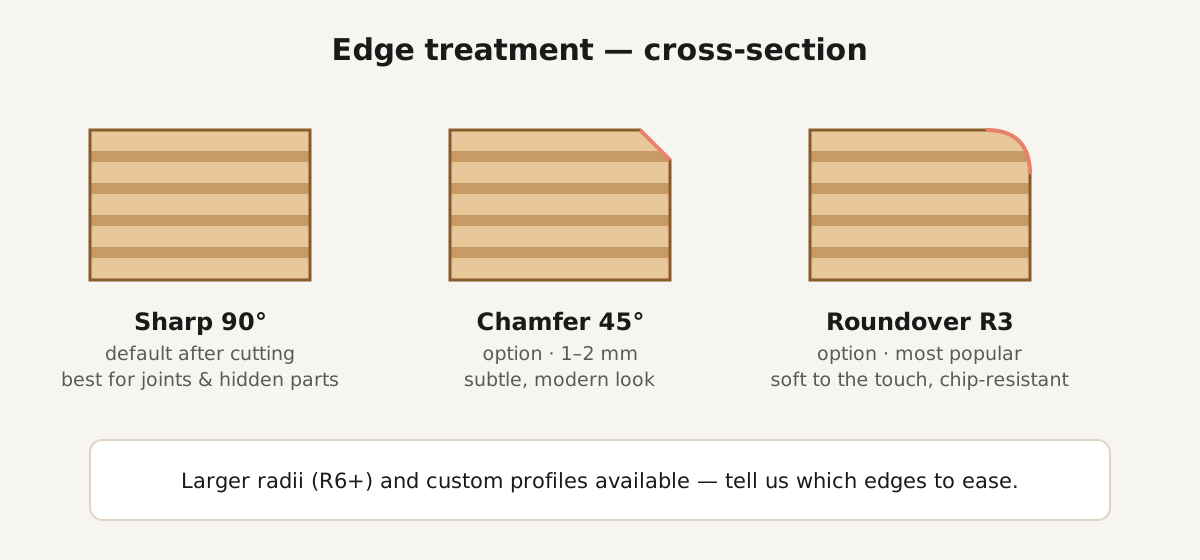
A freshly milled edge on plywood or MDF is crisp and square — genuinely sharp to the touch. For structural and hidden parts that's exactly what you want: maximum glue surface, precise fit.
For parts people will touch — tabletops, shelf fronts, children's furniture, handles, trays — you'll usually want the edge eased. This is an add-on operation, and you can choose the profile:
Specify which edges to ease (often only the top face of the outer contour) — easing everything, including joint slots, would ruin the fits. If you're not sure, describe how the part is used and we'll suggest a profile.
For parts people will touch — tabletops, shelf fronts, children's furniture, handles, trays — you'll usually want the edge eased. This is an add-on operation, and you can choose the profile:
- Small chamfer (e.g. 1–2 mm at 45°) — subtle, modern, just removes the sharpness.
- Roundover R3 — the most popular choice: a soft, hand-friendly radius that also makes the edge far more resistant to chipping in use.
- Larger radii (R6 and up) or custom profiles — for a softer, more furniture-like feel.
Specify which edges to ease (often only the top face of the outer contour) — easing everything, including joint slots, would ruin the fits. If you're not sure, describe how the part is used and we'll suggest a profile.
4. Edge quality: three levels, three price points
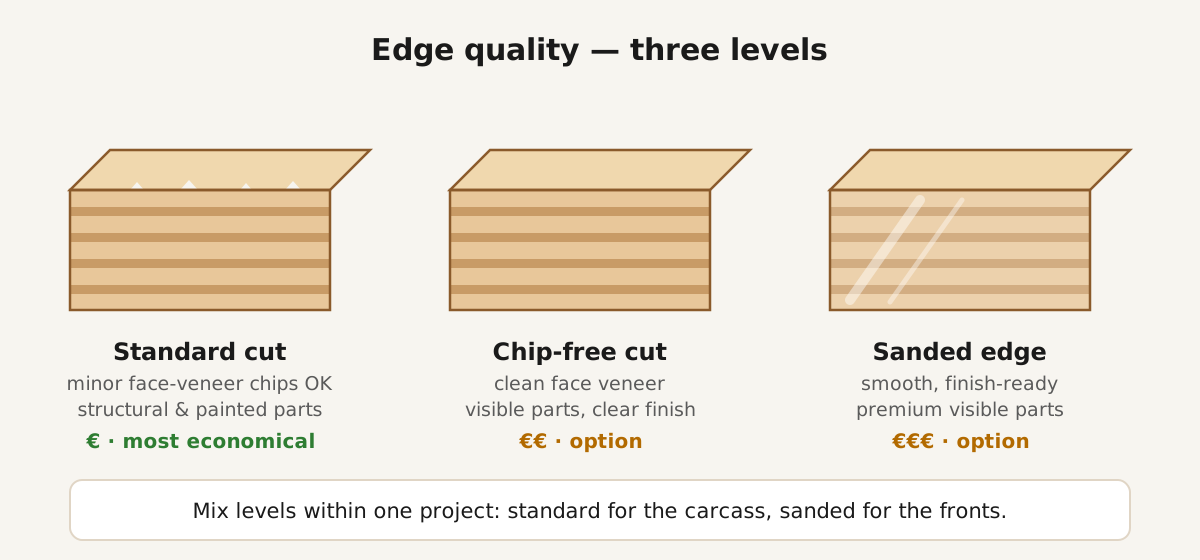
Plywood is a layered material, and the top veneer can chip slightly along the cut — small tear-out fragments a fraction of a millimeter deep. How much of this is acceptable depends entirely on what the part is for, so we offer three levels:
- Standard cut. Minor chipping on the face veneer is allowed. Perfect for structural parts, internal components, prototypes, painted parts where edges get filled anyway. The most economical option.
- Chip-free cut. We use optimized tooling, cutting direction and feeds to keep the face veneer clean. For visible furniture parts that will be oiled or clear-lacquered, where the plywood edge is part of the design.
- Sanded edge. On top of a clean cut, edges are sanded smooth — ready for finishing with no further prep. This is the level for premium visible parts; combined with our oiling or lacquering service, parts arrive ready to assemble.
Choosing the right level matters for your budget: paying for sanded edges on parts that end up inside a cabinet carcass is money wasted, and a standard cut on a clear-lacquered tabletop edge will disappoint. Tell us which parts are visible, and we'll mix levels within one project.
5. Material thickness is nominal — real fits need real numbers
An "18 mm" birch plywood sheet actually measures somewhere around 17.5–18.2 mm depending on brand and batch. For most parts it's irrelevant. For press-fit joints and slotted assemblies it's critical — a slot drawn at exactly 18 mm may end up loose or impossibly tight.
The simple solution: flag which slots must fit the material, and we adjust them to the measured thickness of the actual sheet before cutting. As a rule of thumb, a slot equal to real thickness gives a tight hammer fit; add 0.1–0.3 mm for a sliding fit (and remember that paint or lacquer adds thickness too).
6. Standard sheet sizes — design around them
Material is often the biggest cost in a CNC job, and it's bought by the sheet. Knowing standard formats helps you design parts that nest efficiently:
Typical sheet formats on the market
Birch plywood
1250 × 2500 mm (most common), 1525 × 3050 mm, 1525 × 1525 mm
MDF
2800 × 2070 mm, also 2440 × 1220 mm and 1220 × 3050
Chipboard / melamine-faced board
2800 × 2070 mm
OSB
2500 × 1250 mm
HPL / compact laminate
4200 × 1300 mm
Two practical takeaways:
- If your part is just slightly larger than half or a quarter of a sheet, shrinking it by a few centimeters can dramatically improve nesting and cut your material bill.
- Very large one-piece parts are possible — our machine takes sheets up to 2070 × 4000 mm — but check that the material you want actually exists in that format, or plan the part as a two-piece assembly with joinery.
Ten identical parts nest far better than one, so if you're prototyping something you'll produce in a batch later, ask for both prices at once.
You don't need a perfect file to start. Send what you have — a DXF, a 3D model, or a sketch — together with a couple of sentences about what the part is for. We'll handle the CAD preparation, recommend the material grade and edge options, and nest everything for the best material use.
Upload your file and get an estimate within 24 hours. We cut plywood, MDF, solid wood and plastics in Tallinn and deliver finished parts across the EU.
Upload your file and get an estimate within 24 hours. We cut plywood, MDF, solid wood and plastics in Tallinn and deliver finished parts across the EU.

Feel free to ask any questions!
Contacts
Have a project in mind?
We’re ready to help.
We’re ready to help.